Your First Dialog
By now, you should have a working installation of VNgen setup according to the Setup & Installation guide. With your project prepared, a fresh object's Step Event should currently look something like this:
Example#
Now it's time to start filling those events with actions!
Creating Text#
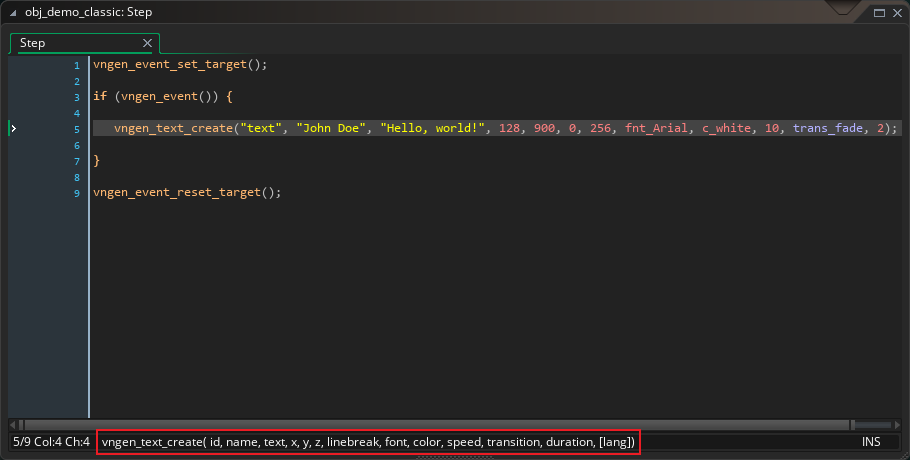
At the heart of any visual novel or narrative-driven game is on-screen dialog. Let's start by creating some text:
Example#
The simplified vngen_text_create script accepts arguments in the following order: ID, speaker name, text, x, y, z, linebreak (or width), font, text color, transition, transition duration. Optional arguments can also be added for ease mode and language. In practice, you won't need to remember this order since syntax guides will always be provided at the bottom of your code editor window.

In our example, the text "Hello, world!" is assigned to the character "John Doe" and displayed 128 pixels from the left and 900 pixels from the top of the screen. At 1664 pixels wide, the text will wrap into a new line with a margin of 128 pixels on either side of a 1080p display, but this should be plenty to fit our text with the chosen font, fnt_Arial. Furthermore, the text will fade onto the screen over a period of 2 seconds.
That's quite a lot of information conveyed in a single action!
Replacing Text#
But what if we want to wipe the screen clean and start a new line of text from scratch? Do we have to destroy the first one and create it again?
While that is certainly possible, there's a much better way: replacing the text we already created.
Example#
First, note that to replace text, we have created a new event. In general, 'create' actions cannot be combined with 'replace' or 'destroy' actions for the same entity in a single event. (Other action types generally can be combined, as we'll see in Styling Text.) In VNgen, text is an extra special case because it will normally pause event progression until the user clicks to continue to the next event. We don't want to replace text before the user has a chance to read it in the first place! For these reasons, new on-screen text should always be performed in a new event.
In the first event, we created a line of text with the ID "text". Now we can create a new event and manipulate the same line of text by addressing its ID. In the example above, only the line of text being spoken has changed, but if we wanted, we could also change who's speaking, what font and color the text appears in, and how long to fade from the old text to the new text.
Of course, it's a bit of a waste to specify all these values again and again if only one property is changing. Fortunately, there's a way we can simplify our example even more:
Example#
Notice how in this version of the example, the character name, font, and text color aren't specified at all, but instead use macros to save space and time. Macros and keywords are predefined constants and variables which trigger special behaviors in certain scripts.
note
Not all script arguments support macros and keywords. Refer to the full reference guide to learn which scripts support which macros and keywords for which arguments.
In this case, previous is used to set the speaker name to the name used in the previous text action of the same ID, "text". The inherit macro is even more special, and leads us right into our next subject: styling text.
Styling Text#
In our first example, we assigned a font and color to our text, then replaced it with the same properties. Each time you update text font or color, it is assigned to the speaker name (not text ID) and stored in memory for the duration of your entire project. To restore the current styles for a given speaker, we use the inherit keyword in place of a font or color. This grants each speaking character in VNgen unique text styling without the need to redefine styling in each new event. Styling done once never has to be done again for that speaker's text!
But that's not all! What if you want your text to have a gradient? An outline? A shadow? VNgen can do that too, and all it needs is a simple 'modify' action:
Example#
Our text will now be displayed with a four-color gradient fading vertically from white to gray, along with a black shadow and outline effect. The two-second style change duration matches up with our initial fade transition to ensure text appears seamlessly. From now on, so long as we use the inherit keyword for the color property on any lines where "John Doe" is the speaker, this gradient will be restored without having to run another vngen_text_modify_style operation again!
Now, let's take it one step further by adding a second character to interact with into the mix:
Example#
Now we've added just one new event with one new action, but it's just as powerful as the previous three actions combined! We've created a new string of text, assigned it to a new speaking character, "Jane Doe", and passed the first character's text font and colors into the second character via the previous macro. Just like previous can be used to pass in the most recent speaker name, it can pass in text styling as well! This text styling will now be assigned to "Jane Doe" independently and can be modified later without affecting the other character.
Effective use of available actions, macros, and keywords makes displaying text both easy and powerful!

 X1
X1