Creating Custom Effects
At its core, VNgen is a sequenced animation system with visual novel functions layered on top. Events and actions form a timeline of visual changes, often enhanced by built-in transition effects and keyframe animations. But what if you've dreamed up an action or animation completely unlike those offered by other systems? What about animating game properties that aren't part of VNgen at all? What about creating, drawing, and removing custom elements in a single action?
With VNgen's keyframe effects scripts (a subset of qScript) all of these things are possible.
Introduction to Keyframes#
In animation (both digital and otherwise), a keyframe represents a significant change in motion. Rather than produce an animation one subtle frame at a time, creators focus only on the start and end of each motion, resulting in a sequence that roughly portrays how the final animation will play out. Once all the keyframes are in place, it's much easier to fill in the gaps with frames in between, smoothly transitioning from one keyframe to the next.
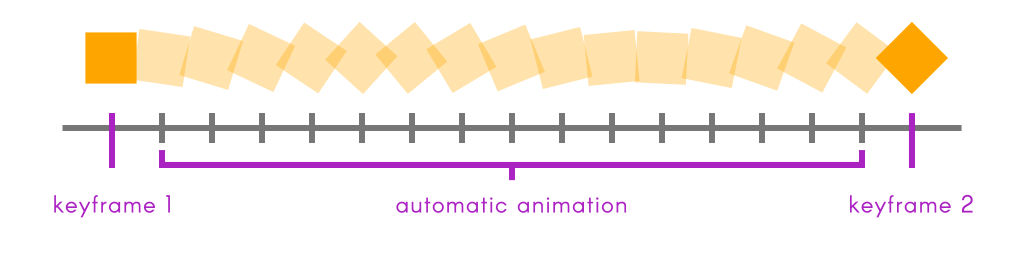
In VNgen, these "in-betweens" are generated automatically, meaning all you have to worry about are the keyframes themselves. Set any properties you want to change in a keyframe and they'll smoothly interpolate to their new values.
Effect Properties#
Effects are written using two separate categories of keyframes: properties (the keyframe) and code (the effect). The syntax for writing standard keyframes is the same as other animations; fundamentally, the only difference lies in the way these properties are used in custom code.
VNgen uses an array of special variables which can be defined as virtually anything for the duration of the effect. However, it is important to note that these variables are temporary, and their values will be reset at the end of each frame (or when the next effect is executed, if any). As such, effect variables should never be used as references to 'volatile' data such as surfaces or data structures, as doing so will result in a memory leak.
note
Another consequence of effect variables being temporary is that any properties not specified in a keyframe will be interpreted as their default values. For this reason, even if a modified property isn't meant to change for several keyframes, it must be declared in every keyframe for the modification to persist.
Modifiable Properties#
| Property | Type | Description |
|---|---|---|
ef_var[0] ... ef_var[#] | real/string | Custom variable, default value = 0 |
ef_ease | integer/macro | Ease mode for the current keyframe |
Although effect values are custom and can serve a wide variety of purposes, for many effects it is helpful to have access to certain outside variables as well. This way, effects can be made that adapt to a variety of scenarios without modification. As such, VNgen also passes certain input properties to effect scripts.
Input Properties#
| General Properties | Type | Description |
|---|---|---|
input_rate | real | The current game speed multiplier, adjusted for FPS and delta time |
input_width | real | The current viewport width |
input_height | real | The current viewport height |
input_x | real | The current global horizontal offset defined in vngen_object_draw |
input_y | real | The current global vertical offset defined in vngen_object_draw |
These values cannot be modified, and represent properties of the engine itself.
Your First Effect#
Now that you're familiar with the concept of keyframes and which properties can be animated with them, it's time to start creating keyframe effect scripts of your own!
To begin, create a new script in your project's asset browser. Before we begin adding keyframes, however, we must first decide what code our effect will execute, which will also determine which properties our variables will behave as.
All effect code is executed under a single keyframe labeled simply 'effect':
Example#
While there's no limit to what code an effect can contain, it's important to note that all effects will be executed in the GameMaker object Draw Event, and as such are unsuitable for performing regular programming tasks. Instead, let's begin by drawing a colored rectangle which will flash on and off the screen.
Example#
Note how in the example above, ef_var[0] is input as the alpha value even though it hasn't been declared yet. It's good practice to plan out your use of available effect variables in this way before beginning to create keyframes. Of course, it would also be possible to use ef_var[1], ef_var[2], ef_var[3], and ef_var[4] as the rectangle X, Y, width, height, and so on if we desired, but for the sake of this example, we'll stick to using ef_var[0] as alpha only.
With our code set up and our variables decided, we can now add our first keyframe:
Example#
note
Keyframes may appear before or after effect code. Because execution order is predetermined, where each type of keyframe appears in the script is inconsequential.
If you're already comfortable with qScript, this syntax should be quite familiar to you. In a sense, VNgen keyframes behave like stripped-down Quantum events, only instead of populating them with actions, we'll need to populate them with effect variables instead. In keeping with our earlier example, a simple keyframe would look something like this:
Example#
At this point, we already have a complete effect: a white rectangle with the position and size of the perspective camera will fade from fully transparent to fully opaque, then fade back out--even though we haven't told it to! When an effect ends, all modified properties are smoothly returned to their default values over the same duration as other keyframes. You can think of it as an 'invisible' keyframe automatically placed at the end of every script.
Of course, this all assumes the effect isn't looped. If it is, the screen will remain white forever since our one keyframe will be repeated over and over without end. To create a meaningful loop, we'll need to add a second keyframe as well:
Example#
Now the entity will fade in and out regardless of whether loop is enabled or not. If so, the screen will continue to flash for as long as we allow the effect to run. And of course, there's no limit to how many keyframes we include in our effect, or how many variables we create or modify in a single keyframe.
Once your effect is complete, save the script and execute it with the vngen_effect_start action. It really is that simple!