Creating Custom Animations
At its core, VNgen is a sequenced animation system with visual novel functions layered on top. Events and actions form a timeline of visual changes, often enhanced by built-in transitions and animation effects. But what if you've dreamed up an animation completely unlike the built-in ones? What about animating entities after their transitions have already completed? What about performing entire animations in a single event?
With VNgen's keyframe animation scripts (a subset of qScript) all of these things are possible.
Introduction to Keyframes#
In animation (both digital and otherwise), a keyframe represents a significant change in motion. Rather than produce an animation one subtle frame at a time, creators focus only on the start and end of each motion, resulting in a sequence that roughly portrays how the final animation will play out. Once all the keyframes are in place, it's much easier to fill in the gaps with frames in between, smoothly transitioning from one keyframe to the next.
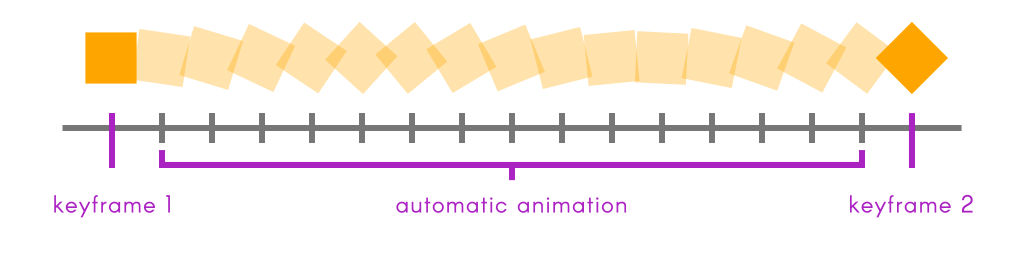
In VNgen, these "in-betweens" are generated automatically, meaning all you have to worry about are the keyframes themselves. Set any properties you want to change in a keyframe and they'll smoothly interpolate to their new values.
Animatable Properties#
Keyframe animations come in three categories: transitions, transforms, and deforms. The syntax for writing all three is the same; fundamentally, the only difference is which properties they animate.
As animations represent temporary changes to the entity being animated, VNgen does not modify animated properties directly. Instead, it passes certain values into animation scripts, checks keyframes for changes, and reads the results back into the animated entity in real-time. Not only does this preserve the entity's original values, but provides a common set of input and output values just for writing keyframe animations.
note
Another consequence of animations being temporary is that any animatable properties not specified in a keyframe will be interpreted as their default values. For this reason, even if a modified property isn't meant to change for several keyframes, it must be declared in every keyframe for the modification to persist.
There are two kinds of animation properties in VNgen: input (read-only) properties, and output (modifiable) properties.
First, the output, or modifiable properties:
Transition Properties#
| General Properties | Type | Description |
|---|---|---|
trans_left | real | Relative left crop |
trans_top | real | Relative top crop |
trans_width | real | Relative width crop |
trans_height | real | Relative height crop |
trans_x | real | Relative horizontal position |
trans_y | real | Relative vertical position |
trans_xscale | real | Relative horizontal scale multiplier |
trans_yscale | real | Relative vertical scale multiplier |
trans_rot | real | Relative rotation, in degrees |
trans_alpha | real (0-1) | Relative alpha value |
trans_ease | integer/macro | Ease mode for the current keyframe |
Transform Properties#
| General Properties | Type | Description |
|---|---|---|
anim_x | real | Relative horizontal position |
anim_y | real | Relative vertical position |
anim_xscale | real | Relative horizontal scale multiplier |
anim_yscale | real | Relative vertical scale multiplier |
anim_rot | real | Relative rotation, in degrees |
anim_col1 | color | Top-left gradient color |
anim_col2 | color | Top-right gradient color |
anim_col3 | color | Bottom-right gradient color |
anim_col4 | color | Bottom-left gradient color |
anim_alpha | real (0-1) | Relative alpha value |
anim_ease | integer/macro | Ease mode for the current keyframe |
| Perspective Only | ||
anim_xoffset | real | Relative perspective horizontal 'angle' |
anim_yoffset | real | Relative perspective vertical 'angle' |
anim_zoom | real | Relative perspective zoom multiplier |
anim_strength | real | Relative perspective parallax strength multiplier |
note
Some perspective animation properties are mapped to general properties and can be used interchangeably: anim_zoom = anim_xscale and anim_strength = anim_yscale. Only anim_xoffset and anim_yoffset are unique to perspective.
Deform Properties#
| General Properties | Type | Description |
|---|---|---|
def_width | integer | The number of columns in the deform mesh |
def_height | integer | The number of rows in the deform mesh |
def_xpoint[0, 0] ... def_xpoint[1, 3] | real | Mesh point horizontal offsets |
def_ypoint[0, 0] ... def_ypoint[1, 3] | real | Mesh point vertical offsets |
def_ease | real | Ease mode for the current keyframe |
note
Deformations cannot be performed on the perspective, therefore there are no special deformable properties.
As you probably noticed, most animatable properties are not only temporary, but relative to the entity's current properties. This means that setting anim_x to 50, for example, would offset the animated entity by 50 pixels to the right of its current position, rather than to the 50th horizontal pixel in the room. Relative values are especially important for deformations, which would otherwise constrain all animated entities to the same shape! Instead, one size truly fits all.
Even so, there are still times when writing animation scripts that it is useful to know the entity's original properties. This way, animations can be made that adapt to a variety of shapes and sizes in ways that make the most sense for each. As such, VNgen also passes certain read-only input properties to animation scripts.
Input Properties#
| General Properties | Type | Description |
|---|---|---|
input_width | real | The current entity width |
input_height | real | The current entity height |
input_x | real | The current entity horizontal room position |
input_y | real | The current entity vertical room position |
input_xscale | real | The current entity horizontal scale multiplier |
input_yscale | real | The current entity vertical scale multiplier |
input_rot | real | The current entity rotation, in degrees |
| Perspective Only | ||
input_zoom | real | The current perspective zoom |
input_strength | real | The current perspective parallax strength multiplier |
note
As with the corresponding output properties, perspective input properties are mapped to general properties and can be used interchangeably: input_zoom = input_xscale and input_strength = input_yscale
These values cannot be modified, but represent some important properties of the entity currently being animated. Transitions, transforms, and deforms all have access to them, so don't hesitate to include them in your scripts!
Your First Transform#
Now that you're familiar with the concept of keyframes and which properties can be animated with them, it's time to start creating keyframe animation scripts of your own!
To begin, create a new script in your project's asset browser and add your first keyframe:
Example#
If you're already comfortable with qScript, this syntax should be quite familiar to you. In a sense, VNgen keyframes behave like stripped-down Quantum events. Only, instead of populating them with actions, you'll populate them with animation properties instead. In keeping with our earlier example, a simple keyframe would look something like this:
Example#
At this point, we already have a complete animation: the animated entity will move 50 pixels to the right, then move back--even though we haven't told it to! When an animation ends, all modified properties are smoothly returned to their default values over the same duration as other keyframes. You can think of it as an 'invisible' keyframe automatically placed at the end of every script.
Of course, this all assumes the animation isn't looped. If it is, the entity will appear to get stuck with a 50-pixel offset since our one keyframe will be repeated over and over without end. To create a meaningful loop, we'll need to add a second keyframe as well:
Example#
Now the entity will shift 50 pixels to the right, then 100 pixels to the left, ending up 50 pixels left of its original position. If the animation is looped, it will continue bouncing 100 pixels back and forth for as long as we allow the animation to run. And of course, there's no limit to how many keyframes we include in our animation, or how many properties we modify in a single keyframe. Perhaps we should add a little rotation too? How about an ease effect for impact?
Example#
Once your animation is complete, save the script and execute it with a vngen_*_anim_start action. It really is that simple!
Your First Transition#
The same principles of regular animations apply to transitions as well, but with a few key differences:
First, transitions can only be applied with vngen_*_create and vngen_*_destroy scripts.
Second, on create, an entity jumps directly to the values specified in the first keyframe of a transition animation (instead of interpolating there from its default values). This makes single-keyframe transitions much more useful than regular animations, since a second keyframe is always implied.
For example, the transition...
Example#
... would cause the entity to fade in from an alpha of 0 to a default alpha of 1 at the time of create, or fade out from the current alpha to 0 at the time of destroy.
Third, while other animations can be played forwards or backwards at will, a transition's direction is determined by when it occurs. Create transitions always perform forwards, while destroy transitions always perform in reverse.
Keep these simple differences in mind and you'll be making your own transitions in no time!
Your First Deform#
What might not be so simple is applying the same logic to deforms. It's relatively easy to form a mental image of what changing an entity's position and rotation will look like, but deforms can be much harder to imagine. However, in principle the two types of animations are the same.
Consider the following example:
tip
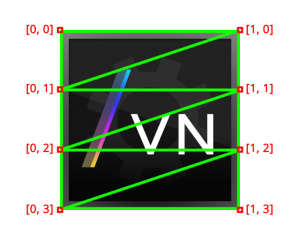
Enabling VNgen's built-in debug mode will display overlays like the example above on all active deform animations in real-time
When a deform is applied to a VNgen entity, it switches from the standard drawing process to being drawn as a mesh of triangles. These triangles are mapped to a grid of points forming columns (the X axis) and rows (the Y axis). By default, deforms are assumed to be two columns wide and four rows tall, giving a range of points from [0, 0] to [1, 3]. Other subdivisions can optionally be specified inside a special keyframe labeled simply 'deform' and placed at the top of your deformation script.
Example#
In the above example, the deform width (columns) and height (rows) are set to the default values, in which case including this section is not necessary and can be left out of the deformation script. For the purposes of this documentation, these defaults will be assumed.
Rather than modify global properties like position and rotation, deformation animations manipulate each point's X and Y coordinates to stretch the final image into different shapes.
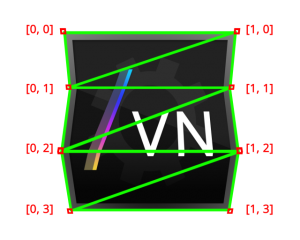
note
Simulated image
In this example, all we've done is modify the X position of points [0, 1], [1, 1], [0, 3], and [1, 3], much like in the example of a transform animation. The similarity becomes even more apparent when written as a keyframe:
Example#
And again, if we wanted to reverse the effect for an endless loop, we could simply create a second keyframe modifying points [0, 0], [1, 0], [0, 2], and [1, 2] instead:
Example#
Note that the second keyframe does not define X points [0, 1], [1, 1], [0, 3], and [1, 3]. This would only be necessary if we wanted them to maintain their positions from the first keyframe or shift positions again. In VNgen animation scripts, any undefined properties in a given keyframe will be returned to their default values, therefore each point from the first keyframe will be treated as 0.
Also note that in this example, point values are arranged in a grid imitating each point's physical position relative to one another. This is a great way to visualize your keyframes as you write them.
With keyframes such as these in place, we can now save the script and execute it with a vngen_*_deform_start action. Don't let the 2D structure intimidate you: mesh deforms are really quite simple and just as easy to create as transform animations.
Creating 'Living' Characters#
While many entities in VNgen support deform animations, a prime use-case is characters.
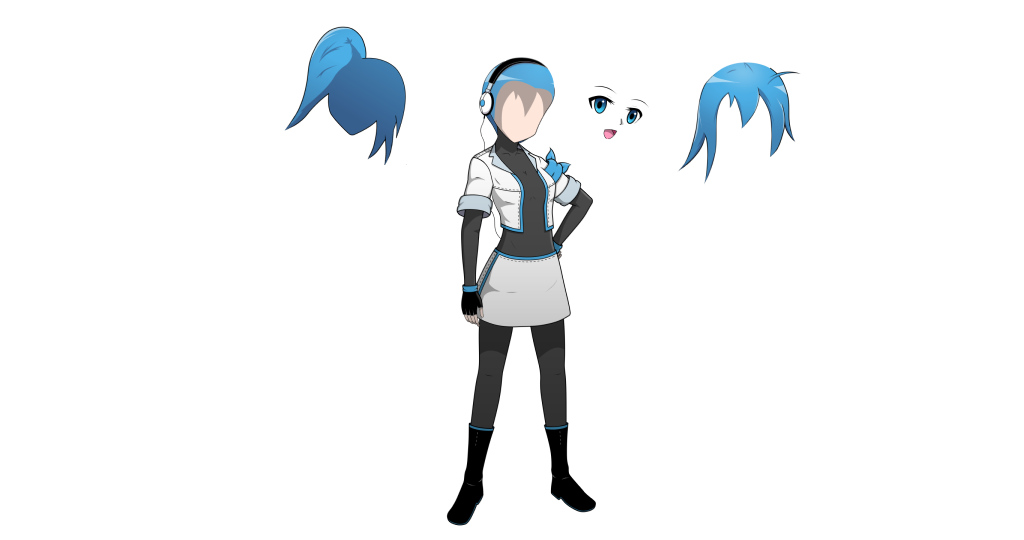
Characters are drawn as a composite texture of one or more sprites comprising the body, face, and any other elements you may desire. Using character attachments, it is possible to draw separate sprites for hair, clothing, even individual limbs and beyond! And as unique entities themselves, each attachment, or 'layer', can have its own animations of any kind. Try creating custom deform scripts for each attachment and watch your characters come to life!
For full details, see the Characters and Attachments sections.